Create Your Own Rescue Partition With Easy Restore Option at No Costs
When you are a bit handy with computers, you soon become a kind of computer god to your family and friends and if you don’t watch out, you get overloaded with questions and problems. If that is not enough you find yourself (re)installing each computer over and over again. Wouldn’t it be nice, if they can help there selves and you are just needed once in a (long) while?
Lots of computer manufactures, deliver there systems with a so called rescue partition or CD/DVD. Which can restore the system in its original state. With this option they hope to give there customers a easy way to “fix” there computer. Even if you have such an option I still recommend to create your own option, cause most of those “restore” actions not only restore the OS, but also all the software you (probably) don’t need. Also after a couple of months you probably need to install tons of OS updates after a restore. Before you start, it is good to know that some of the actions are quite risky and may destroy your installation or partition table. So watch out and test(or practice) in an “test” environment. If you don’t have the hardware for testing, then a Virtual environment, like VMWare, VirtualPC, Virtualbox, etc. is very handy.
Let’s start
The idea is simple, we create an extra partition on the hard drive, which is going to store the rescue image (sort of packed installation of an OS). We add a boot menu to the boot order, which gives us the opportunity to boot into the extra partition. After booting in this extra partition it shows us a menu, which gives us the option to restore the system or to create a new image. We need the following software, a boot manager and a small Linux distribution. In this post I use Plop Linux and Plop bootmanager. Which both can be found here. Thanks to Elmar for creating this excellent free tools! (For this test I use Windows XP as the “primary” installation, but you can use any OS you like. If they need another file system, you need to edit the rescue script).
Step 1 – Downloading the tools
For this blog I use version 4.1.1 test 3 of Plop Linux cause 4.1.1 was giving some problems. If you are testing on a physical system burn the ISO to a CD.
Step 2 – Prepare the system (Partitioning and Installing Windows)
I just assume, you didn’t install any OS yet. So we can delete and create partitions without being afraid of losing some data. If you already have an OS running and do not have some spare space for a rescue partition, you need a partition manager which is capable of resizing and creating partitions without losing any data. For now we just use the Windows XP installation for partitioning the system. Start the installation and make just one partitions (not the whole disk!) for the actual Windows installation, the rest of the space is needed for the rescue partition. I normally make the rescue partition at least the same size or a bit bigger then the “primary” partition. (Sorry a bit Dutch ;-)) We don’t care about the second partition for now. Just install Windows.
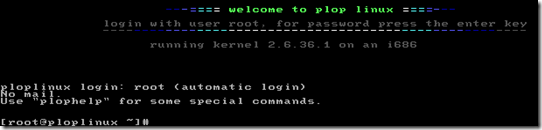
Step 3 – Creating the rescue partition** After the install of Windows boot from the Plop CD (or image).
With the command fdisk –l, you can check the connected disks and the available partitions.

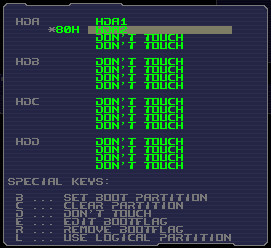
Start fdisk with the right harddisk to create the “rescue” partition. In my case, the commando is. “fdisk /dev/hda” In the menu press “n” for creating a new partition and press “p” for making it a primary partition. In our case it is partition 2 and it uses the full size (enter twice). If you press “p” you see, what the partition table looks like if you write it to disk.

If you are ok with it, press “w” to write the partition table. Reboot the system from CD to make sure the partition table is correctly loaded. When running fdisk –l again it should show something like the picture below.

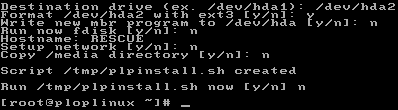
Now we can install Plop. For this, type “installplop”. Make sure you enter the right destination drive, in our case “/dev/hda2” and also make sure you don’t write anything to the MBR. Do not run “plpinstall.sh” !
We need to make some slight enhancements to the installation script. You can edit the script, by typing “nano /tmp/plpinstall.sh”. Find the lines:
prompt timeout=20 default=ploplinux boot=/dev/hda2 map=/boot/map lba32 vga=1 compact
And change them to.
#prompt #timeout=20 default=ploplinux boot=/dev/hda2 map=/boot/map lba32 vga=0x317 compact
Save the file and exit nano (CTRL+X). Now we’re ready to install Plop, by typing “/tmp/plpinstall.sh”.
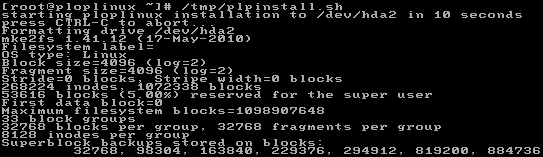
Now it is save to reboot and continue with step 3.
Remark
If you get some errors like:

You also need the change the line “chroot $MNT lilo” to “chroot $MNT lilo –P ignore” and run the installscript again.
Step 4 – Creating the boot Menu
Boot your system from the Plop Linux CD (or by mounting the ISO).
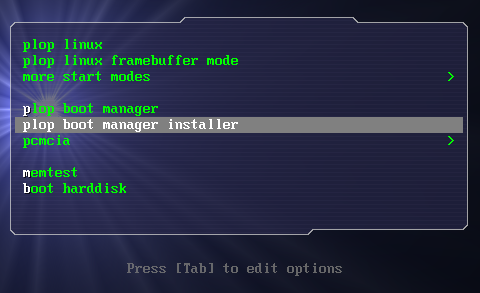
Choose the option “plop boot manager installer”. Make sure that you install the boot manager to the correct hard disk (option 7), after this you can install the boot manager, option 1.
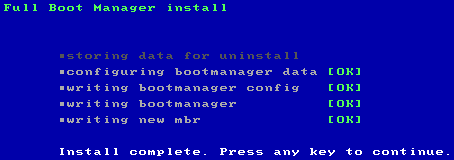
That’s it, the boot manager is installed. Reboot the system, so we can configure the boot manager.

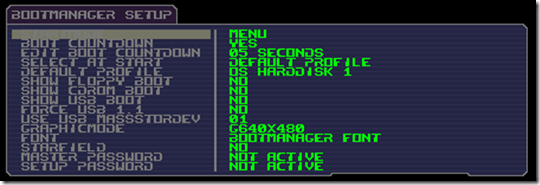
I usually make the menu plain and simple, so that there are only two options, the “default” which will start after a certain amount of time and the “rescue” option. Go to setup –> bootmanager and make the following settings.
boot countdown: yes
edit
boot countdown: 5 seconds
select at start: default profile
show floppy
boot: no show cdrom
boot: no show usb
boot: no
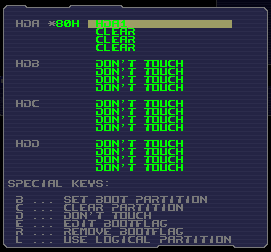
Now the menu is simple, we create the two profiles. Go to settings – profiles, select the first profile and press enter. Edit the label to something useful like “Windows XP”. To make sure Windows doesn’t see, the “rescue” partition, we need to go to “linked partitions”. Make sure the first partition is set to “boot partition”, this can be done by pressing “b”. Set the rest of the partitions to “clear”, this makes the partition(s) invisible to Windows.
Next we create the “rescue” profile, so go to settings – profiles and press the down key once. This selects the second profile, even if it is empty, press enter, to configure this profile. Type a name, like “rescue” and set visibility in the menu to “yes”.

Go to linked partitions and make sure both partitions are visible. Also make sure that the second partition is the boot partition, you can accomplish this by pressing the “b”.
Test it, by going to the menu and boot Windows and the second time boot the Rescue profile. If they both work you can continue with step 4.## Step 4 – Making the “rescue” / image script
Now we can boot into Windows and a small Linux distribution it is time to create the “rescue” script. We don’t want a user to worry about Linux commands it is just a simple restore. First of all I’m not a BASH guru, so probably not everything is done in the most efficient way. In order to make the rescue process possible, we need to create two directories.
mkdir /mnt/images mkdir /mnt/script
The first directory is going to store the created images and the second one stores the script. Now we make the script.
nano /mnt/script/rescue.sh
Fill in the code below for a basic “script”.
#!/bin/bash
#
# AUTOIMAGE SCRIPT
#
# CHANGES: ROB 2010-12-30 First attempt.
# TODO:
#
#Expects the "next function" as a parameter
CheckPassword(){
clear
echo "To continue, give in the password"
echo
read password
if [ "$password" == "the password" ]; then
$1 $2
fi
MainMenu
}
#Delete image, expects the filename as parameter
RemoveImage(){
clear
echo "Are you sure, you want to remove $1 ? [Y/N]"
echo
read ok
case "$ok" in
"Y" | "y" | "J" | "j" )
rm $1
MainMenu
;;
* ) #MainMenu
MainMenu
;;
esac
}
#Verwacht als parameter de vervolgfunctie
ListImages(){
clear
echo "Available images"
i=1
for test in /mnt/images/*
do
echo [$i] $test
array[$i]=$test
let i=$i+1
done
echo
echo "Make a choice"
read choice
CHOICE=${array[choice]}
$1 $CHOICE
}
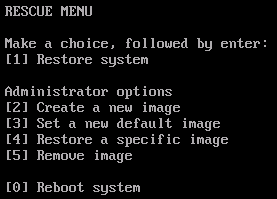
MainMenu(){
clear
echo "RESCUE MENU"
echo
echo "Make a choice, followed by enter:"
echo "[1] Restore system"
echo
echo "Administrator options"
echo "[2] Create a new image"
echo "[3] Set a new default image"
echo "[4] Restore a specific image"
echo "[5] Remove image"
echo
echo "[0] Reboot system"
echo
read choice
case "$choice" in
"0" ) #Reboot
shutdown -r now
;;
"1" ) #Restore System
PutImage /mnt/images/default.000
;;
"2" ) #Create a new image
CheckPassword PullImage
;;
"3" ) #Set a new default image
CheckPassword ListImages SetStandardImage
;;
"4" ) #Restore a specific image
CheckPassword ListImages PutImage
;;
"5" ) #Remove image
CheckPassword ListImages RemoveImage
;;
* ) #Bad choice
MainMenu
;;
esac
}
#Create an image
PullImage(){
clear
echo "Give in an image name."
echo
echo "TIP!: Put the date in the filename, like 010111_WinUpdates"
read name
clear
echo "Create an image with the following name $name continue? [Y/N]"
read ok
case "$ok" in
"Y" | "y" | "J" | "j" ) #Image maken
hdimg=$(fdisk -l | grep NTFS) && hdimg=${hdimg:0:9}
partimage -z0 -b -o -d -V100000 -f2 save $hdimg /mnt/images/$name
MainMenu
;;
* ) #Terug naar menu
MainMenu
;;
esac
}
#Expects the imagename as parameter
PutImage(){
clear
echo "Are you sure? [Y/N]"
echo
read ok
case "$ok" in
"Y" | "y" | "J" | "j" ) #IMAGEN
#Pick the right partition
hdimg=$(fdisk -l | grep NTFS) && hdimg=${hdimg:0:9}
#Partimage
partimage restore $hdimg $1 -b -f2
;;
* ) #Back to MainMenu
MainMenu
;;
esac
}
SetStandardImage(){
clear
echo "Set defualt Image"
echo
echo "Are you sure, you want to set $1 as the defualt image? [Y/N]"
read ok
case "$ok" in
"Y" | "y" | "J" | "j" ) #Set default
#Rename old image (date +%Y%m%d-%H%M%S)
mv /mnt/images/defualt.000 /mnt/images/olddefault_$(date +%Y%m%d-%H%M%S).000
mv $1 /mnt/images/default.000
MainMenu
;;
* ) #Back to MainMenu
MainMenu
esac
}
MainMenu
You can exit the script by pressing CTRL+X. Now we need to make the script executable, this can be done by: chmod +x /mnt/script/rescue.sh You can test the script by typing “/mnt/script/rescue.sh”.

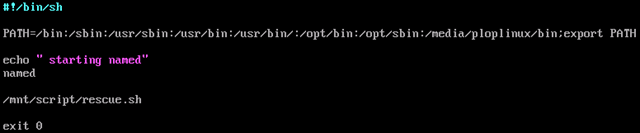
The password in the script is “the password”, the disk which gets imaged is the disk which shows in the output of “fdisk –l”, “ntfs”. This probably gives error if you have more then one NTFS partition. The last step is to automatically start the menu, when the user boots into “rescue” mode. For this open the rc.local in nano or vi and add “/mnt/script/rescue.sh”, just before “exit 0”. nano /etc/rc.local
Final note
This is just a simple start, to create the bare minimum, since it is all “open” it is easy to extend, modify,etc. This is just a blog post, which might gets you started. For example, if you are in a business environment, think about booting from PXE and image over the network. We use this for our “thin” clients, which run on Windows XP Embedded. I always find it nice to hear improvements, different thoughts, etc.
UPDATE 2011-04-20
Made some minor changes, like adding chmod+x and changes /mnt to $MNT.