Nested Nsx Vmware Nsx on Intel Nuc Lab Setup Part 3
In the previous two posts I described how to set-up a nested ESXi environment on the Intel NUC and how to install and configure it for NSX. So in this post I assume everything is installed and configured and we can actually start deploying a network.
Logical Switch
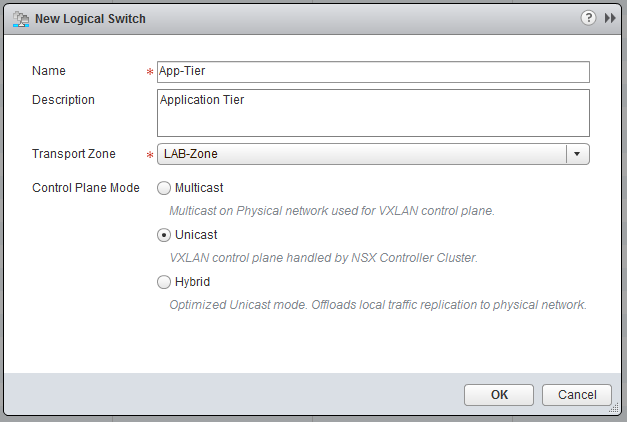
If not already, go to “Network & Security” and click on “Logical Switches”, click the green plus sign, to add a Logical Switch. I used the following settings:
- Name: App-Tier
- Description: Application Tier
- Zone: LAB-Zone
This is it, we have created a working logical switch, however to see if it actually can switch, we need to put some workload on it. To show that the communication within the Logical Switch is completely independent of the underlying network, I put the two VMs on this switch, within a completely different subnet than already used.
- IP1: 172.20.20.2/24
- IP2: 172.20.20.3/24
We are going to deploy two VMs I used Debian for this, but you are free to use whatever you want, as long as it can do IP. This is what I configured:
- Name: App-VM1 / App-VM2
- OS: Debian 7 - 64bit
- vCPU: 1
- MEM: 512MB Ram
- IP: 172.20.20.2 / 172.20.20.3
- Subnet: 255.255.255.0
- GW: 172.20.20.1
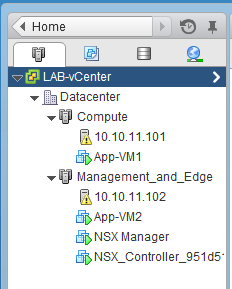
Make sure you deploy a VM on ESX01 and one on ESX02, also connect them for now to the pgCompute1 and pgManagement port-group.
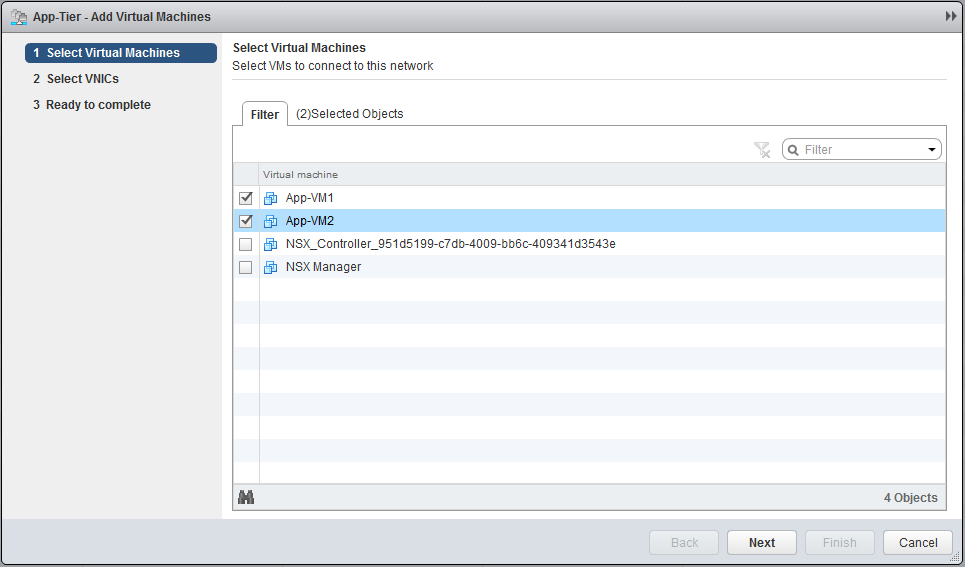
When both VMs are deployed, go to “Logical Switches” and click on “Add VM”, select the two VMs, select both the NICs and finish the task.
Configure the VMs with the appropriate network settings and do a ping test to each other. If everything went well, you should get a reply.

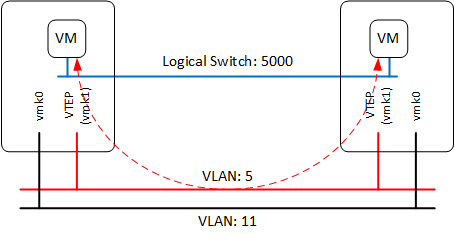
Before we continue it is nice to take a look at the controller, to see what information is stored here and get an idea how the actual traffic flow is working. You can log-in to the controller with SSH and username “admin” and the password specified earlier. With the following two commands you can list the VTEP interfaces and the MAC-addresses. The number 5000 is the segment ID (VNI = Virtual Network Identifier) assigned to the logical switch. Which can be found in the webinterface under Logical Switches.

nvp-controller # show control-cluster logical-switches vtep-table 5000
VNI      IP              Segment         MAC               Connection-ID
5000     192.168.5.11    192.168.5.0     00:50:56:62:a3:86 2
5000     192.168.5.10    192.168.5.0     00:50:56:66:dd:df 7

nvp-controller # show control-cluster logical-switches mac-table 5000
VNI      MAC               VTEP-IP         Connection-ID
5000     00:50:56:99:d0:77 192.168.5.11    2
5000     00:50:56:99:6b:d9 192.168.5.10    7
In my case the MAC addresses of the VM’s are.
- App-VM1: 00:50:56:99:6B:D9
- App-VM2: 00:50:56:99:D0:77
You could also use the following command, to see the ARP table, remember this like normal switches has a time-out, so when it is empty initiate a ping or some other traffic.
nvp-controller # show control-cluster logical-switches arp-table 5000
VNI      IP              MAC               Connection-ID
5000     172.20.20.3     00:50:56:99:d0:77 2
5000     172.20.20.2     00:50:56:99:6b:d9 7
As you can see in the mac-table, there is a relationship between the MAC address and the VTEP-IP. What it actually says is that if App-VM1 sends something to App-VM2, the traffic will be encapsulated (VXLAN-header), with the destination IP (192.168.5.11) of the VTEP connected to the host running the VM. After the host received the traffic, it is being decapsulated and sent to the VM, so the VM’s don’t know anything about how the traffic is handled and won’t see any difference between a virtualized or a traditional network.
Distributed Router
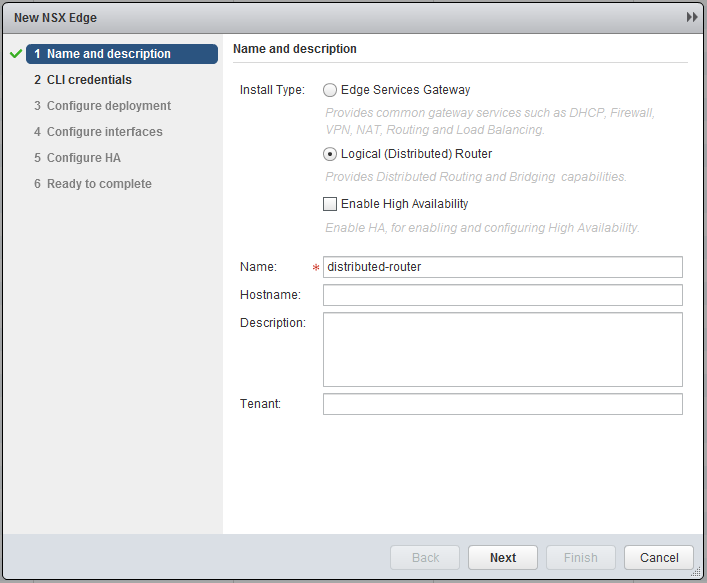
Another neat feature of NSX is the distributed router, this not only means you can route traffic, but the neat thing about it is, that this can be done on “host”-level. This means that when two VMs are running on the same host, but in different subnets, the distributed router (remember installed VIB) will route the traffic in the kernel, so the traffic won’t have to leave the host! To create a distributed router, go to “Network & Security” and click on “NSX Edges”. (If you ask me, they should make two categories, “NSX Edges” & “Logical Routing”, this would make a in my opinion lot more sense) Click the green plus sign and select logical distributed router.
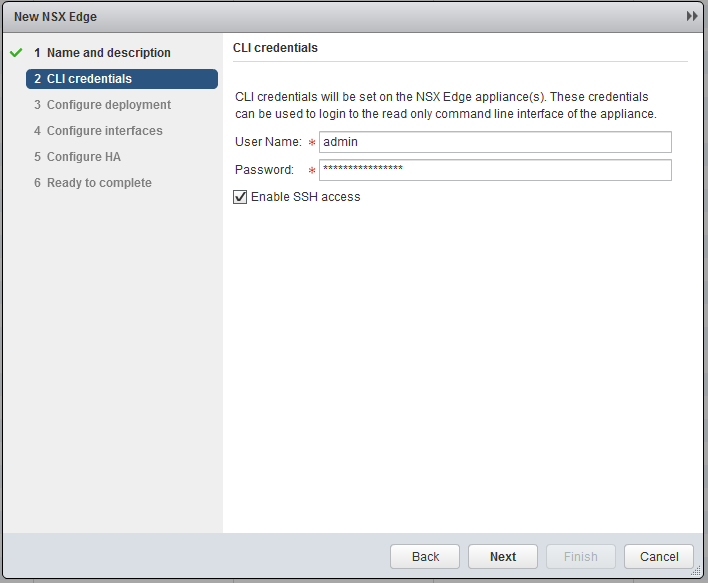
Next specify a password and Enable SSH acces.
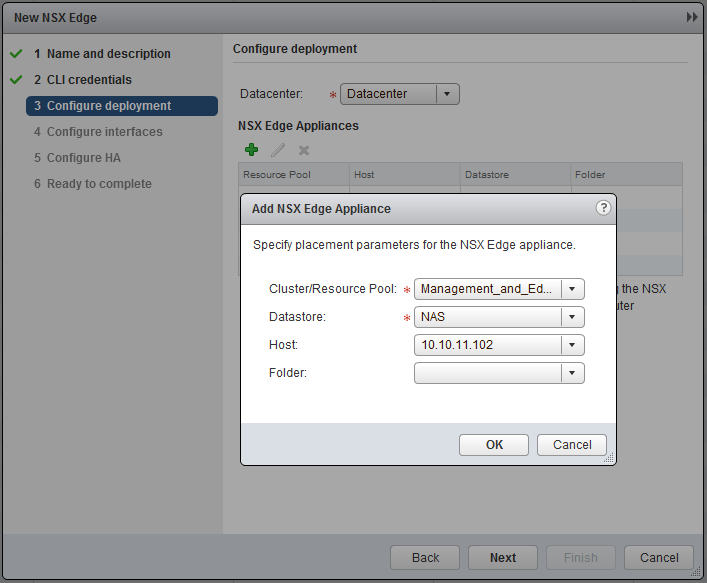
Specify the “Management_and_Edge” cluster.
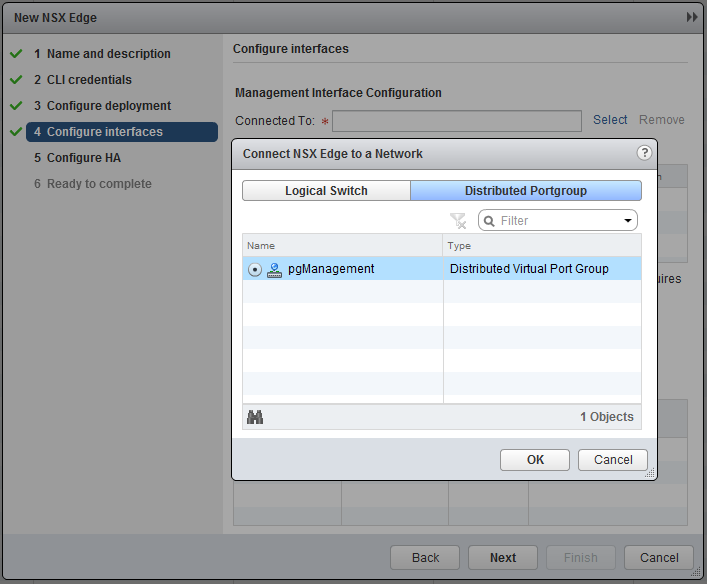
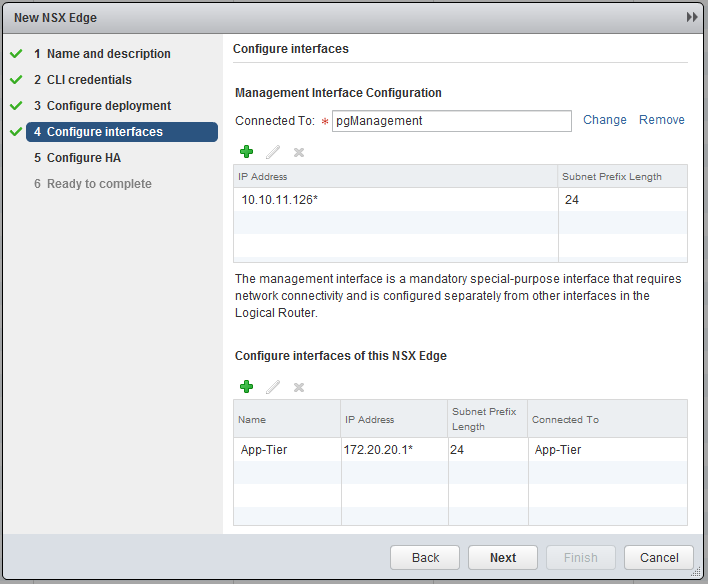
Connect the management interface to the “pgManagement” port-group and specify an IP, in my case 10.10.11.126.
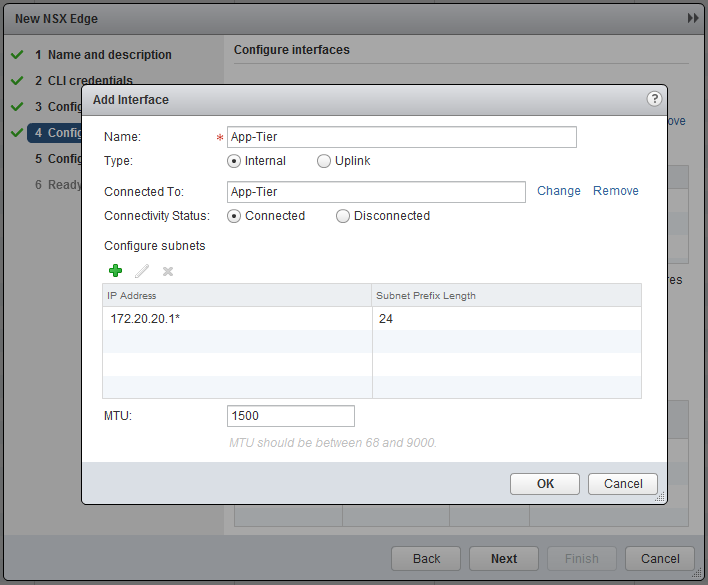
Add an interface and connect it to the “Logical Switch” - “App-Tier” and specify an interface, in this case 172.20.20.1 [!
When done with step 4 it should look as follow.
We can skip the HA configuration and continue, when satisfied with the settings, click Finish.

The first thing we want to do is enable routing between two logical switches. Therefore go to Logical Switches and create a second one, named: “Web-Tier”.

Deploy (or clone) a new VM and connect it to this “Logical Switch”.
- Name: Web-VM1
- OS: Debian 7 - 64bit
- vCPU: 1
- MEM: 512MB Ram
- IP: 172.20.10.2
- Subnet: 255.255.255.0
- GW: 172.20.10.1
- Cluster: Compute
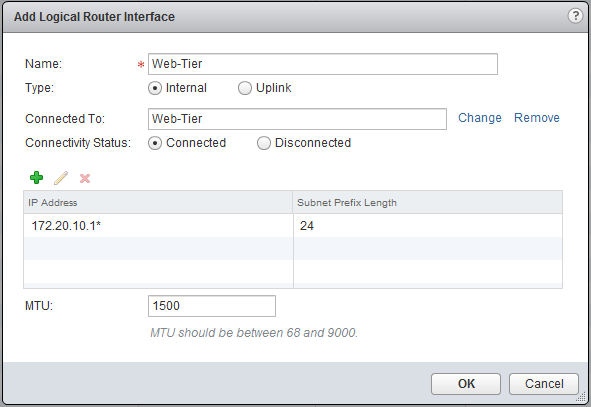
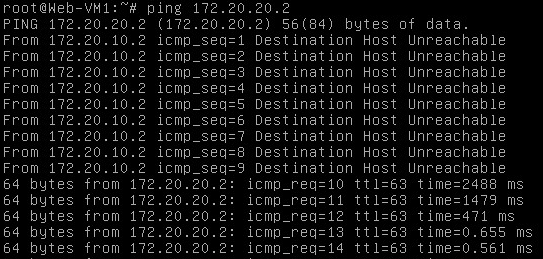
Since we didn’t connect the distributed router to the Web-Tier Logical Switch, there is no gateway and no communication possible between the App- & the Web-Tier. The App-Tier is connected and you can try ping the gateway 172.20.20.1 from one of the App-VMs, this should work. Go back to NSX Edges en open the distributed router we created, select the Manage tab, click on Settings and select interfaces. Now click the green plus sign and add the Web-Tier and create an interface with IP 172.20.10.1.
Before you click OK, open the console of the Web-VM1 and start a ping to one of the App-VMs, now click OK. Immediately after the configuration, you should get a response on the pings.
It is important to know that the logical router instance (VM) is in this example purely for configuration of the distributed router and that traffic won’t go through it. When sending traffic to App-VM1 which is on the same host, the traffic won’t leave the host, but is routed at the kernel. If traffic is send to App-VM2, the traffic is routed on the host of the Web-VM1 and send (on the App-Tier Logical Switch) to the other host, like it was L2 switching. The last part of this post is bringing data outside the virtual world, there are two ways of accomplish this. The first one is bridging and the second one is routing. I won’t go further into bridging, but what it simply said does is, connecting a VXLAN to a VLAN.
Edge Services Gateway
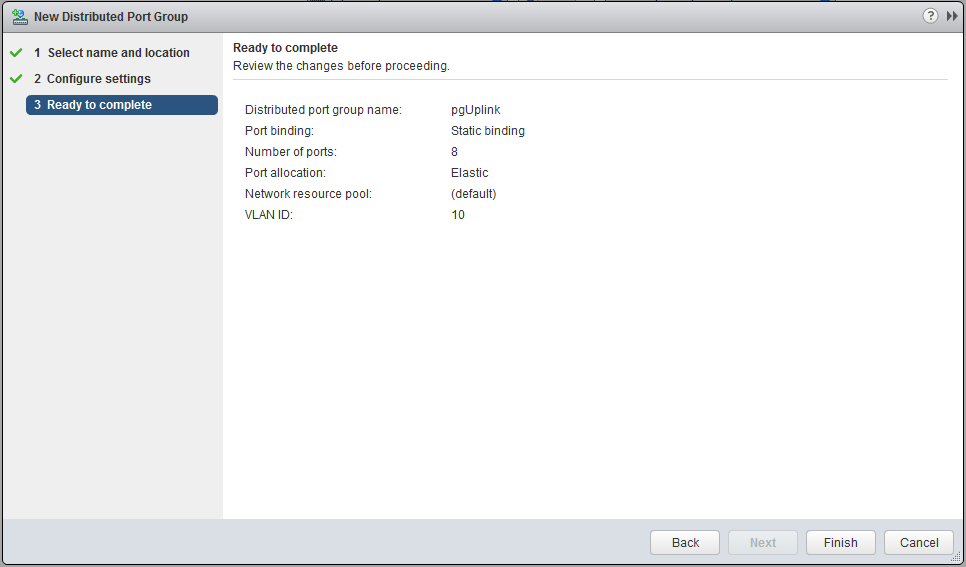
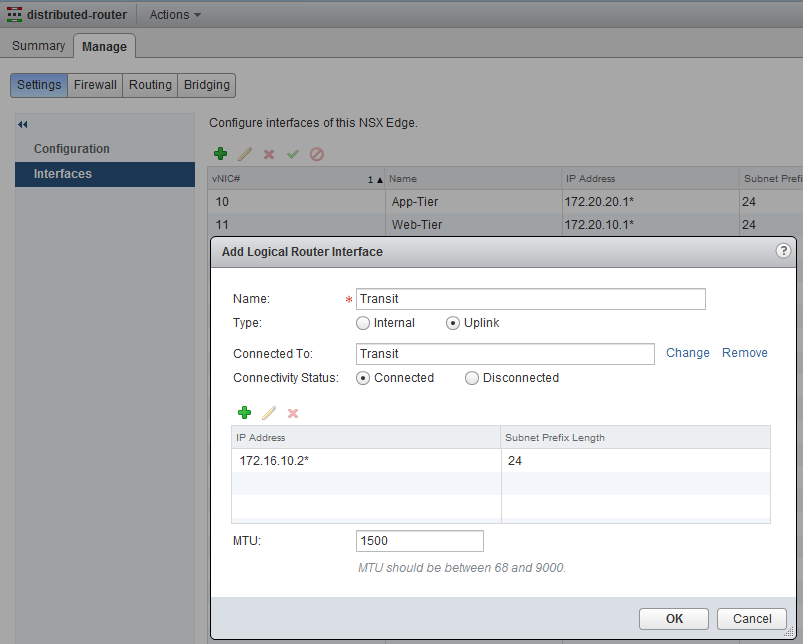
Best practice is that we use an Edge Services Gateway (ESG) for connection with the outside world. This means that the Logical Router will forward the traffic to the ESG and the ESG will route the traffic to the physical world. This is just one of the many functions the ESG can do, it can also NAT, Loadbalancing, basic firewalling, etc. VMware likes to call it a “swiss army knife” due the roles it can fulfill. Between the Logical Router and the ESG we will have a so called transit network, for this create a new Logical Switch and name it Transit.
My uplink is in a different VLAN, so I created a new portgroup pgUplink, but if your network is flat or you want to (mis)use the management port-group, this is no problem. Make sure, when you create an additional port-group, do this at the Management and Edge (cluster) Distributed Switch.
Go back to the NSX Edges and click the green plus sign, similar to the deployment of a Logical Router, however now we choose Edge Services Gateway.
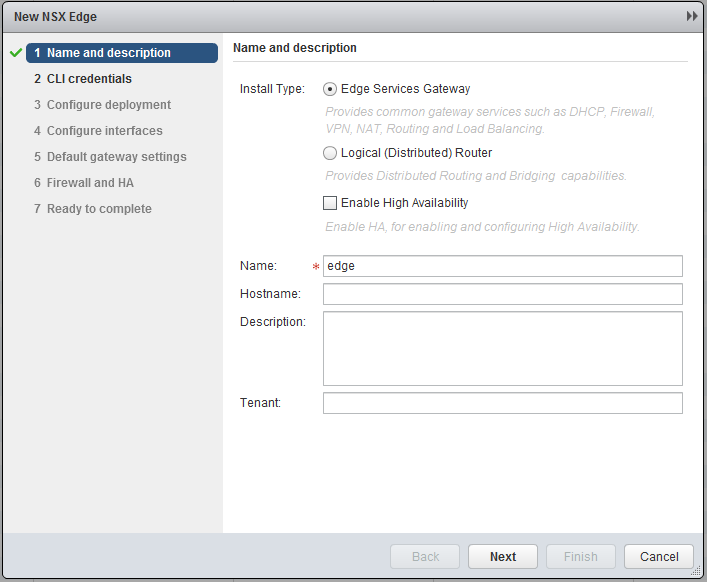
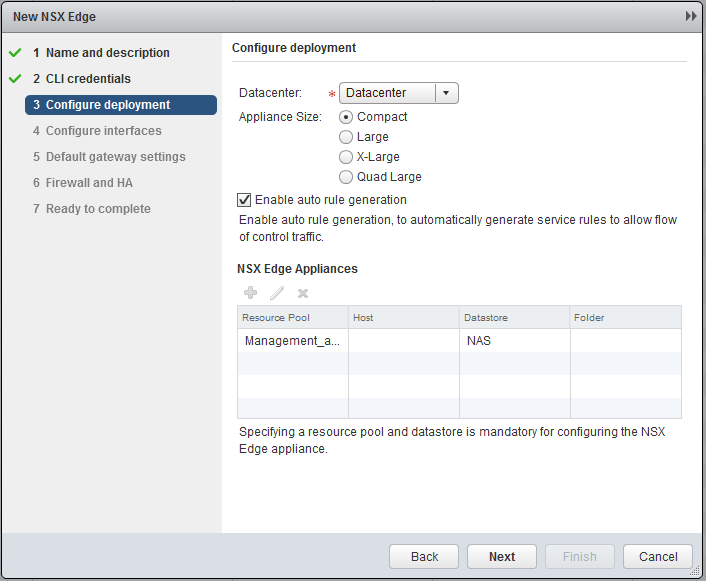
Fill in the credentials and select the Management and Edge Cluster for deployment. A Compact deployment for this LAB is sufficient.
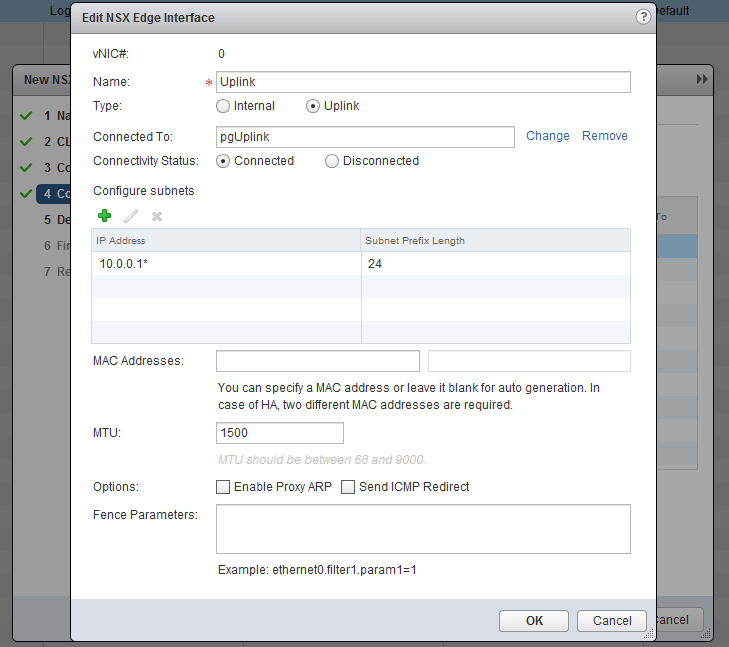
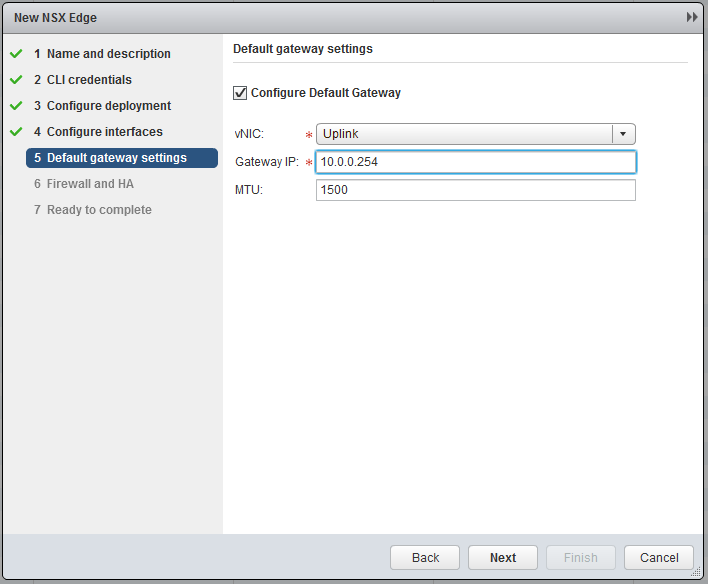
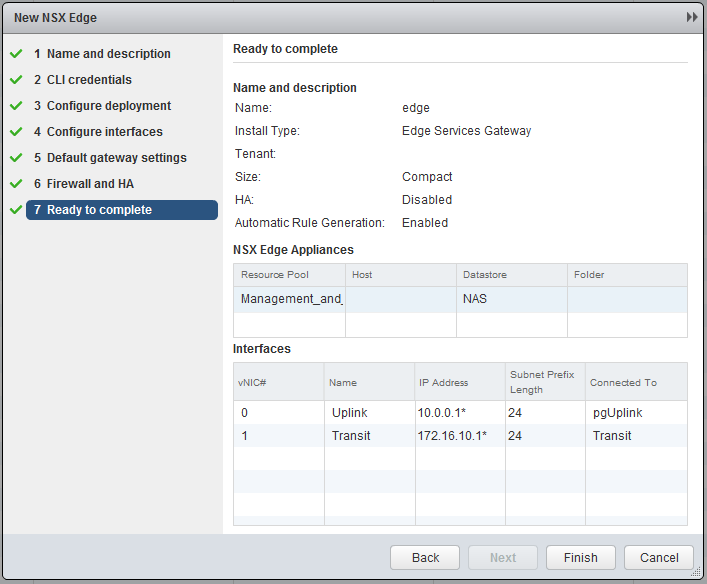
Now the most important part, create the interfaces. Chooste “internally” for the Transit. I will use 172.16.10.0/24 as transit subnet and the Edge will get .1 and the Logical Router (later on) .2. In the Uplink subnet I have 10.0.0.0/24 and will use 10.0.0.1 for the Edge. My physical router has 10.0.0.254, so this will become my default gateway.

Leave all the further settings default and finish the wizard.
Now open the just deployed ESG and go Manage, Routing, (for now) we will create static routes to the Logical Router we created earlier. Add the following two routes for the App and Web tier, by clicking on the green plus sign.
- 172.20.10.0/24 - 172.16.10.2
- 172.20.20.0/24 - 172.16.10.2
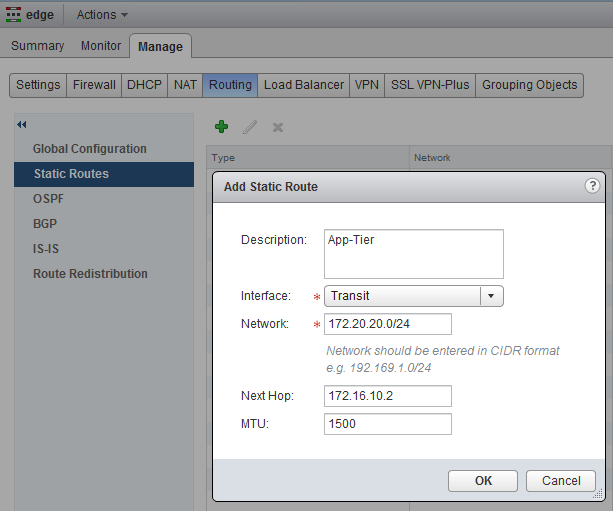
If you added both routes, click on Publish Changes.

The next step is to add the 172.16.10.2 interface to the Logical Router, and set the default gateway for the Logical Router to the ESG. Open up the settings page for the Logical Router and add the interface.
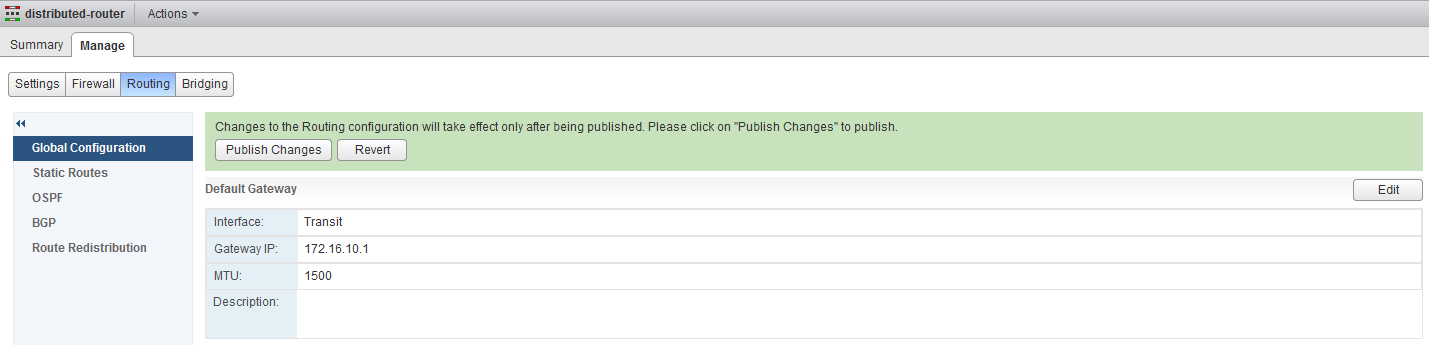
Go to routing and set the default gateway under Global Configuration to the ESG, make sure to Publish Changes when you are done.
Now almost everything is set, however when you will test to communicate with the outside world, you will see that it will fail, there are two more (small) steps to take. First, make sure the outside world, your router or cliënt has a route to the new Web and App subnets. I first tested it of my desktop client, which has an IP in 10.0.0.0/24. I added a specific route to the WebVM.
- 172.20.10.2/32 - 10.0.0.1
Now the very last step is to check the firewall of the ESG, by default it only has a rule which accept traffic, which has a source VSE (I assume this stands for vShield Edge). For this lab we will add a rule, which allows any traffic. Go to the ESG and click on firewalling and click the green plus sign. It will by default create a rule which accepts any, any, any :). Don’t forget to publish the new rule.

Now you can test and everything should work! Now we have set-up a very basic and simple lab environment which runs NSX pretty well. Even despite the limited resources, the Intel NUC has proven itself to be capable of handling the load and give a decent lab experience. I think this lab is a very good starting point for further testing and learning with NSX and probably some more posts will follow concerning NSX configuration, for me it will hopefully help to eventually get my VCIX-NV. I hope you had fun and please let me know if you have any further questions, ideas or suggestions.