Synology Fileshare Behind a Reverse Proxy
I can imagine that it is a very common scenario, you want to share files, which are located on a Synology NAS and don’t want to open up all the ports on your firewall. After all, the fileshare function is just a simple webpage, which offers a file. Luckily this can be easy put behind a reverse proxy, which would be an ideal situation for a SMB or even home use. So let’s start, first off all make your plan, which port do you want to use, which IP and/or virtual hostname. In this example, I go for a virtual hostname, cause I’ve only one public IP address. I also assume that you already have a reverse proxy up and running in this case this is accomplished by Apache2.
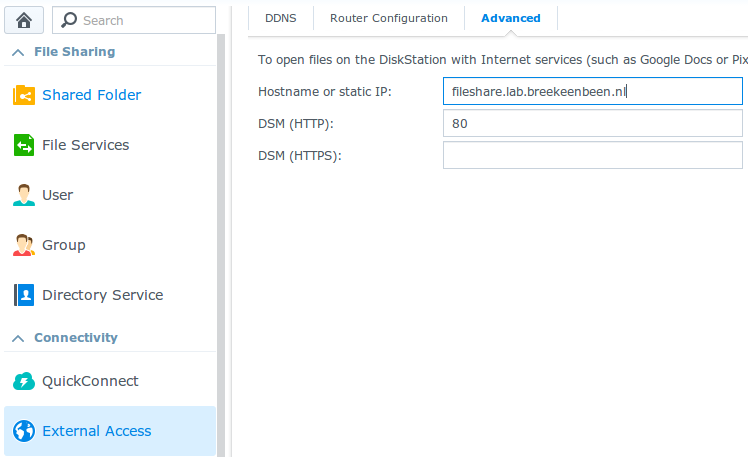
- Virtual hostname: fileshare.lab.breekeenbeen.nl
- Port: 80 (http)
Step 1: Create a DNS entry (A record)
Create a DNS entry which points to your public IP which is natted (or directly connected) to your reverse proxy. (e.g. fileshare.lab.breekeenbeen.nl 1.2.3.4)
Step 2: Get your inside ip and port
Get your inside ip and port for gaining access to the link, which the Synology will offer. (Default this is http://internetIP:Port) You can easily find this out, by accessing File Station, press right on a file and select Share File Links, it will look like this http://192.168.1.10:5000/fbsharing/FxEWvvty
Step 3: Create your reverse proxy rule
Go to your Apache configuration and (in my case) create a file/site with the reverse proxy configuration. (e.g. for Ubuntu / Debian)
sudo nano /etc/apache2/sites-available/002-filesshare_synology
Which will create a file, put in the following configuration, where the proxypass and proxypassreverse contain the inforamtion protocol, IP and port from step 2.
 ServerName fileshare.lab.breekeenbeen.nl

        CustomLog       /var/log/apache2/fileshare_access combined
        ErrorLog        /var/log/apache2/fileshare_error

        #Enable Reverseproxying
        ProxyRequests Off

        Order Deny,Allow
                Allow from all

        ProxyPass / http://192.168.1.10:5000/
        ProxyPassReverse / http://192.168.1.10:5000/
Just enable the site and restart Apache or reload the configuration
sudo a2ensite 002-fileshate_synology
sudo service apache2 reload
Step 4: Make Synolgoy create the right links
Now we have to make sure, that the Synology will generate the correct URL’s. Go to “Control Panel”, “External Access”, _“Advanced” _and fill in the appropriate information and click on “Apply”, in this example;
Step 5: Test & Enjoy
If you now create a link from File Station, it should create a link which looks like http://fileshare.lab.breekeenbeen.nl:80/_fbsharing/FxEWvvty_ You can test this by using thins link in a browser from an Internet connected device. _If you also want to use this link internally, you have to create an internal DNS entry to the reverse proxy.