Restoring Esxi After Connecting the Usb Boot Device to Vmdirectpath
Introduction
With VMWare 4.x comes a great feature to allow VM’s to talk directly to the hardware. Especially at home usage, this is a great feature. For example, I am running a virtual Mediaportal TV-Server with a DVB-T and two DVB-S adapters, more on this in a later blog post.
To let VMDirectPath work (besides the proper hardware), you go to advanced features of the ESX machine and you simple select the hardware which you would like to have available for pass-through. It is important that you realize you give a pass-through to the whole bus.
In my case I have a USB DVB-T adapter which I like to connect to my TV-Server. To accomplish this I need to pass-through the USB controller. As you can see below I have two USB adapters, 00:1a.0 and 00:1d.0.
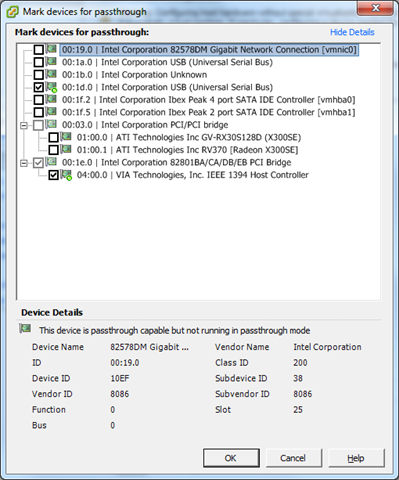
Unfortunately it is hard to find out on which USB controller my DVB-T adapter is connected. So this quickly became a trial and error process. What I didn’t realize at that time was that my ESXi boots from a bootable USB stick and thus is connected to one of the USB controllers. So this became connected to one of my VM’s.
At first I thought that this wasn’t a problem, cause ESXi was still working fine. Until I decided that this wasn’t what I wanted. So I unchecked the USB controller for pass-through and rebooted the ESXi machine (Always necessary after changing the pass-through devices).
After reboot I lost one of the VM’s I created after the time I enabled the USB controller and the pass-through wasn’t changed at all. So now I had a problem.
After some searching on the net I quickly saw that I wasn’t the only one with this problem, but except for the vm-help site I could not find solutions. So I started to follow this, but it quickly turned out to be a dead end. Nevertheless it gives me enough info to solves this problem on my own way.
Solution
I booted up my Linux laptop (you could also use a bootable Linux cd) and connected my USB bootable ESXi stick to it. If you’re running a “user”-friendly distribution it will automatically mount the partitions of the stick, Hyperviser0, Hyperviser1, etc. Otherwise I guess you’re smart enough to mount it yourself.
Go to the Hypervisor1 partition and copy the local.tgz to a temperately working directory. After this you can extract this file. If you’re lucky this goes flawless, if you have less luck, like me, this results in some errors. So be happy with the files that are extracted well and hopefully the esx.conf file is with them.
The most important file to fix everything is the esx.conf file, this file contains a lot of settings for the ESXi machine. You can open this in any text editor, nano, vi or gedit it doesn’t really matter besides your l33t looking editing skills. This file is located in “./etc/vmware/esx.conf”
Search for the lines starting with /device/00:xx.0/owner = “vmkernel” on some of this lines you’ll find “passthru” instead of “vmkernel” change these back to “vmkernel”.
Now if you had no errors with extracting the local.tgz file, you can “archive” the extracted “etc” directory back to local.tgz and copy it back to its location.
If you had errors, the best thing you can do is create a new bootable ESXi stick and boot it at least once. Change something, password or IP-address for example. Now the local.tgz file is created. Shutdown the machine and put the stick back in your Linux machine. Copy and extract the local.tgz file to another directory then the broken one. Copy the files of the broken extraction to this new location and override the files, like esx.conf, license, etc.
Now you can “archive” this directory back to local.tgz and copy it back to the stick.
Boot and you’re done.
If you can’t see your VM’s after the boot, you can easily add these. For this, go to your datastore find your machine and right click on the vmx file. Choose for add to inventory.
Don’t forget to remove or re-add the hardware pass-through devices.
If you use a GUI based archive tool, it can happen that it says archive to tar.gz, this is exactly the same as a tgz file, so a renaming afterwards should do the trick.
My USB stick is created with the mkesxiaio tool.